This calculation deals with the deflection, stress and variation of forces in the loaded flat plates. The calculation is designed for plates that are flat, homogeneous, with the same thickness and made from one material. The plates may be circular, annular circular and rectangular. The plates may be loaded evenly (unevenly) on the whole surface (or its part) or they may be loaded by the force distributed on the circle. The programme enables:
The calculation uses the data, procedures, algorithms and information from the professional literature (Roark formulas, Machinery's Handbook 26th, Teorie desek a skořepin [doc. Ing. Ladislav Šubrt, CSc.] and others)
User interface.
Download.
Purchase, Price list.
Information on the syntax and control of the calculation can be found in the document "Control, structure and syntax of calculations".
Information on the purpose, use and control of the paragraph "Information on the project" can be found in the document "Information on the project".
A plate is the flat construction element (two dimensions are multiply larger
than the third one - thickness) loaded mainly in bend. In terms of the shape,
the plates are circular, rectangular and with general shape.
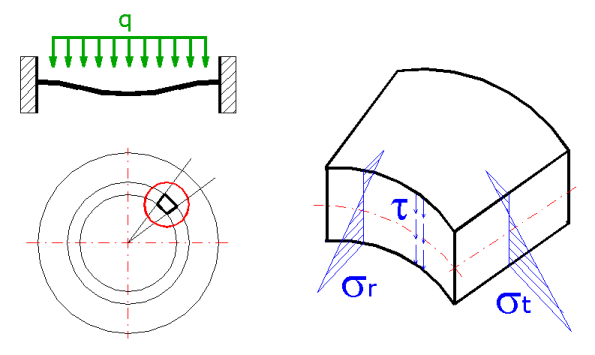
To get the notion of stress, we may use the circular rotation-symmetrical plate,
from which we remove an element and display the respective forces that may be
present.

We assume the linear shape of normal stresses sr,
st with a neutral axis, which is not in the
centre of the plate thickness.
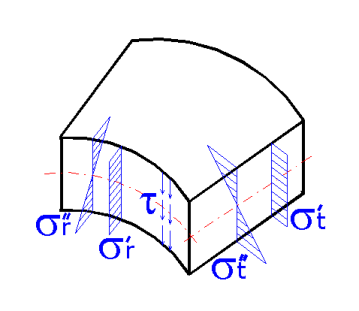
Based on this assumption, the normal stress (both radial and tangential) may be
split into two components.
- Bending stress (the shape as for a simple bend) -
sr',
st'
- Diaphragm stress (the stress is constant along the whole plate thickness) - sr'',
st''
Then the normal stress sr
= sr' +
sr'' possibly
st =
st' +
st''
and the stress on element A may be displayed as follows:

Similarly, the state of stress may be drawn for other, more complicated cases -
e.g. the rotation-asymmetrical plates, rectangular plates etc. These cases would
only differ from this one if more components of the shear stresses were t added.
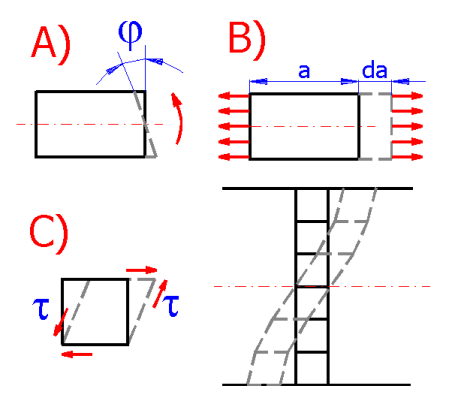
The individual components of stress then result in the presence of the
respective types of deformations.

Based on this knowledge, the plates may be divided into individual groups according to the stress, specifically into:
The "plate thickness" is considered in relation to the stress, prevailing stresses, and the method of handling.
The deflections of a thick plate are very small and therefore the elongation of fibres after deformation may be ignored. As the fibre elongation is caused by diaphragm stresses, the diaphragm stresses may obviously be ignored. However, as a result of the large thickness, the bending stresses are also small and therefore they are comparable with shear stresses. The solution therefore considers the bending and shear stressing. As the shear results in the distortion of the line segments perpendicular to the central plane of the plate, the theoretical solution is rather complicated. This type of plate is not frequently used in the common machine structures.
These plates have smaller thickness, which results in higher bending stresses which prevail over the shear stress. Therefore the shear stresses may be ignored as well as their result, i.e. distortion of the originally straight perpendicular lines to the central plane of the plate. On the other hand, the deflection is not so big to result in a significant elongation of the fibres in the central plane (the plane dividing the plate in the middle of the thickness). Therefore the diaphragm stress may also be ignored. Only the bending stress is considered for these plates with linear distribution of the bending stresses along the plate thickness and the zero bending stress in the central plane of the plate. In terms of the calculation, this is the simplest type of plate. In practical applications, the overall majority of the plates is calculated using the calculation procedures prepared for the medium thickness plates, although this is not always fully justified.
In the case of these plates, the effects of the shear are even less significant than for the "medium thickness" plates and therefore its effects may again be ignored. The bending must be taken into consideration and in addition, the diaphragm stresses also act, which cannot be ignored for the thin plates. It is due to the fact that there are larger deflections which does not go without changes in the length of the central plane fibres. These length changes are related to the acting diaphragm stresses. However, the diaphragm stresses are also present in the case of the push fit. The edges could come close to each other, but if deformed, the originally flat plate changes to a non-developable rotation surface which does not go without the length changes of individual fibres in the central plane. That is why the bending and diaphragm stresses are considered even for the push fit of the thin plates. In addition, this type of plate is non-linear, i.e. deformations and stresses are not directly proportional to the loading, even if the linear Hook principle applies. It is the so-called geometrical non-linearity which results from high deformations - specifically as a result of high turning angles.
Diaphragms are the plates so thin that their bending rigidity is negligible (as well as the bending stress) and only the tension stress is considered (e.g. various rubber barometric diaphragms). As a result of high deformations these are again geometrically non-linear.
Naturally, this division of plates is not fixed, it only refers to certain possibilities of simplification which provides for the simplification of analytical solution while preserving the suitable accuracy in view of the other inaccuracies (including the inaccuracies in fit, machining, material constants etc.).
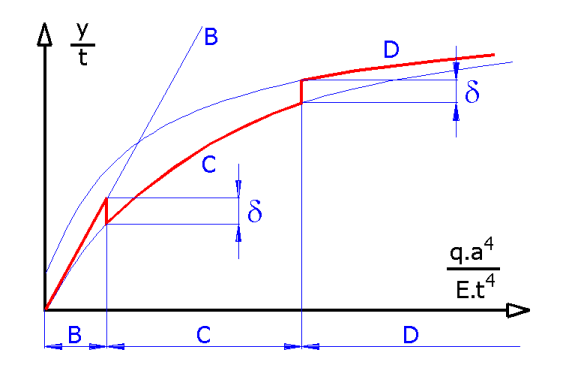
The picture displays the dependence of the dimensionless deflection "y/t" on the dimensionless loading "q*a^4/(E*t^4)", with:
y...maximum deflection
t...plate thickness
q...continuous loading
a...plate radius
E...modulus of elasticity
and individual curves represent:
B) Medium thickness plates (Kirchhoff plates)
C) Thin plates producing large deflections
D) Diaphragms

It follows from the picture that the simplifications adopted for the "Medium
thickness plates" may be used for very small dimensionless deflections. The
"Thin plates" type of calculation must be used for higher dimensionless
deflection.
It also follows from the picture that the limits for individual calculation models cannot be specified unambiguously. It depends on how big an error can be tolerated. If the admissible error is marked delta, then the respective limits for individual calculations may also be specified. Like for the deflection (see the picture), the procedure may be used for the stress.
For practical applications it is useful to know at least roughly the position of the boundary between the calculation models (B and C). If an error smaller than 5 % is required, the deflection should be smaller than one third of the plate thickness; for an error smaller than 10 %, the deflection should be smaller than one half of the plate thickness.
The approximate estimate of an error depending on the deflection related to the plate thickness:
| Deflection [% of thickness] | Error [%] |
| 10% | 0.5% |
| 25% | 3% |
| 33% | 5% |
| 50% | 10% |
| 75% | 20% |
| 100% | 30% |
If the calculation model B (Medium thickness plates) and higher dimensionless deflection (deflection related to the thickness) are used, the error increases sharply, as seen in the picture. Even if the error is on the part of safety, the use of inappropriate calculation results in unnecessarily overdesigned and heavy structures.
The calculations and formulas applied are based on the following conditions.
When handling the deflection (stress, safety) of the circular or rectangular plate, proceed as follows.
Use this paragraph to select units for the calculation and select the material of the designed/checked plate.
Use the drop-down menu to choose the required system of units for the calculation. After the units are switched, all values will be re-calculated immediately.
Use the drop-down menu to choose the proper plate material. If the material constants of your material differ from the material constants specified on line [1.3 - 1.8], uncheck the check box on line [1.3] and set the customized material properties.
Select the requested safety coefficient. The selection of the safety coefficient does not affect the deflection or stress calculation. The safety coefficient affects the design of the maximum loading [2.5, 3.6, 4.6] or the minimum plate thickness [2.2, 3.2, 4.2]. At the same time, the exceeding of the partial safety coefficients in individual paragraphs is checked.
This calculation is used to detect the shape of deflection, stress and slope of medium thickness circular plates, including the maximum values. At the same time it is possible to design the minimum thickness, or the maximum loading which can be applied to the plate. As the diaphragm stress is ignored for this type of calculation (see the theory section), it is necessary to check the maximum deflection which should be smaller than half of the plate thickness. For a deflection higher than 1/2 of the plate thickness, use the calculation in paragraph [5.0].
Use the drop-down menu to select the type of plate that meets your loading and boundary values. After the selection, the schematic picture of the plate is displayed.
Set the plate thickness, outer radius, or inner radius. The plate thickness should be smaller than 1/5 of the radius (1/10 of the radius, in case of higher accuracy demand). If you press the "<min" button, the respective plate thickness is filled in based on the set requested safety coefficient and yield strength. In any case the maximum deflection value must be checked.
Set the radial location of loading. Depending on the type of loading, the radial
location of loading is interpreted as follows:
Distributed pressure: Distributed pressure (constant or increasing
linearly) acts from the edge of the plate to the set radial location of loading.
The radial location of loading can be equal to 0, or the inside radius for the
annular circular plates.
Forced load on circle: The force acts evenly on the circle of the set
radius. If the radial location of loading is smaller than half of the plate
thickness, it is replaced by the so-called equivalent radius ro'=(1.6*ro^2+t^2)^0.5-0.675*t,
which provides for the use of traditional formulas for stress calculation.
Set the applied force that acts continuously on the radial location of loading. For a type of loading other than forced, the input field is grey. If you press the "<max" button, the maximum force is filled in based on the set requested safety coefficient and yield strength. In any case the maximum deflection value must be checked.
There are two methods of setting the load. Either as the pressure or the total force that results from the pressure applied to the plate surface. Use the switch on this line to select the method. If you press the "<max" button, the maximum pressure (force) is filled in based on the set requested safety coefficient and yield strength. In any case the maximum deflection value must be checked.
Set the uniform temperature differential between the upper and lower side of the plate.
Plate weight can be used e.g. in determining the distributed pressure from the weight proper.
After the change of the input data, the results must be recalculated. The programme will gradually recalculate all values in fifty points from r=0 to r=a (or from r=b to r=a for the annular plate). These values are filled into the table and then used to determine also the minimum, or the maximum value of deflection and stress (see the results on the following lines ymax, smax, SFmin). These table values are also used in the graph displayed.
The maximum plate deflection should be smaller than one half of its thickness. For higher values, the error of the result quickly increases due to the calculation method. See the theory section in help for details.
Use the input field to set the radius r, on which you want to determine the
values of deflection, slope, stress etc. You can find the respective results on
the following lines. The green field shows the range of radius r, which can be
set. Use the slider on the right to easily change the value of radius r; the
position is marked with a vertical red line in the graph.
Use the drop-down menu above the slider to display the values in the graph.
The line lists the boundary values which apply to the set plate type and its mounting and loading.
This calculation is used to detect the shape of deflection, stress and slope of annular circular plates, including the maximum values. The plates are of medium thickness. At the same time it is possible to design the minimum thickness, or the maximum loading which can be applied to the plate. As the diaphragm stress is ignored for this type of calculation (see the theory section), it is necessary to check the maximum deflection which should be smaller than half of the plate thickness. The calculation error quickly increases for larger deflection (see the theory section in help).
Use the drop-down menu to select the type of plate that meets your loading and boundary values. After the selection, the schematic picture of the plate is displayed.
Set the plate thickness, outer radius, or inner radius. The plate thickness should be smaller than 1/5 of the radius (1/10 of the radius, in case of higher accuracy demand). If you press the "<min" button, the respective plate thickness is filled in based on the set requested safety coefficient and yield strength. In any case the maximum deflection value must be checked.
Set the radial location of loading. Depending on the type of loading, the radial
location of loading is interpreted as follows:
Distributed pressure: Distributed pressure (constant or increasing
linearly) acts from the edge of the plate to the set radial location of loading.
The radial location of loading can be equal to 0, or the inside radius for the
annular circular plates.
Forced load on circle: The force acts evenly on the circle of the set
radius. If the radial location of loading is smaller than half of the plate
thickness, it is replaced by the so-called equivalent radius ro'=(1.6*ro^2+t^2)^0.5-0.675*t,
which provides for the use of traditional formulas for stress calculation.
Set the applied force that acts continuously on the radial location of loading. For a type of loading other than forced, the input field is grey. If you press the "<max" button, the maximum force is filled in based on the set requested safety coefficient and yield strength. In any case the maximum deflection value must be checked.
There are two methods of setting the load. Either as the pressure or the total force that results from the pressure applied to the plate surface. Use the switch on this line to select the method. If you press the "<max" button, the maximum pressure (force) is filled in based on the set requested safety coefficient and yield strength. In any case the maximum deflection value must be checked.
Set the uniform temperature differential between the upper and lower side of the plate.
Plate weight can be used e.g. in determining the distributed pressure from the weight proper.
After the change of the input data, the results must be recalculated. The programme will gradually recalculate all values in fifty points from r=0 to r=a (or from r=b to r=a for the annular plate). These values are filled into the table and then used to determine also the minimum, or the maximum value of deflection and stress (see the results on the following lines ymax, smax, SFmin). These table values are also used in the graph displayed.
The maximum plate deflection should be smaller than one half of its thickness. For higher values, the error of the result quickly increases due to the calculation method. See the theory section in help for details.
Use the input field to set the radius r, on which you want to determine the
values of deflection, slope, stress etc. You can find the respective results on
the following lines. The green field shows the range of radius r, which can be
set. Use the slider on the right to easily change the value of radius r; the
position is marked with a vertical red line in the graph.
Use the drop-down menu above the slider to display the values in the graph.
The line lists the boundary values which apply to the set plate type and its mounting and loading.
This calculation can be used to determine the maximum deflection and maximum stress for the rectangular plates. The plates are of medium thickness. The maximum plate deflection should be smaller than one half of its thickness. For a deflection higher than 1/2 of the plate thickness, use the calculation in paragraph [6.0]. The calculation error quickly increases for larger deflection (see the theory section in help).
Use the drop-down menu to select the type of plate that meets your loading and boundary values. After the selection, the schematic picture of the plate is displayed.
Set the plate thickness, longer and shorter side. The plate thickness should be smaller than 1/4 of the smallest cross dimension (1/10 in case of higher accuracy demand). If you press the "<max" button, the maximum pressure (force) is filled in based on the set requested safety coefficient and yield strength. In any case the maximum deflection value must be checked.
The force acts evenly on the circle of the set radius. If the radial location of loading is smaller than half of the plate thickness, it is replaced by the so-called equivalent radius ro'=(1.6*ro^2+t^2)^0.5-0.675*t, which provides for the use of traditional formulas for stress calculation.
Set the applied force that acts continuously on the radial location of loading. For a type of loading other than forced, the input field is grey. If you press the "<max" button, the maximum force is filled in based on the set requested safety coefficient and yield strength. In any case the maximum deflection value must be checked.
There are two methods of setting the load. Either as the pressure or the total force that results from the pressure applied to the plate surface. Use the switch on this line to select the method. If you press the "<max" button, the maximum pressure (force) is filled in based on the set requested safety coefficient and yield strength. In any case the maximum deflection value must be checked.
Plate weight can be used e.g. in determining the distributed pressure from the weight proper.
The maximum plate deflection should be smaller than one half of its thickness. For higher values, the error of the result quickly increases due to the calculation method. See the theory section in help for details.
If the calculation of circular plates in paragraph [2.0] results in a plate deflection higher than 1/2 of the plate thickness, it is appropriate to handle the plate deflection in this paragraph. This calculation considers the diaphragm stress which increases the calculation accuracy.
Use the drop-down menu to select the type of plate that meets your loading and boundary values. After the selection, the schematic picture of the plate is displayed.
Set the plate thickness and outer radius. The plate thickness should be smaller than 1/5 of the radius (1/10 of the radius, in case of higher accuracy demand).
Set the force that acts on the small central area. For a type of loading other than forced, the input field is grey.
There are two methods of setting the load. Either as the pressure or the total force that results from the pressure applied to the plate surface. Use the switch on this line to select the method.
Plate weight can be used e.g. in determining the distributed pressure from the weight proper.
If the calculation of rectangular plates in paragraph [4.0] results in a plate deflection higher than 1/2 of the plate thickness, it is appropriate to handle the plate deflection in this paragraph. This calculation considers the diaphragm stress which increases the calculation accuracy.
Use the drop-down menu to select the type of plate that meets your loading and boundary values. After the selection, the schematic picture of the plate is displayed.
Set the plate thickness, longer and shorter side. The plate thickness should be smaller than 1/4 of the smallest cross dimension (1/10 in case of higher accuracy demand).
There are two methods of setting the load. Either as the pressure or the total force that results from the pressure applied to the plate surface. Use the switch on this line to select the method.
Plate weight can be used e.g. in determining the distributed pressure from the weight proper.
Information on setting of calculation parameters and setting of the language can be found in the document "Setting calculations, change the language".
General information on how to modify and extend calculation workbooks is mentioned in the document "Workbook (calculation) modifications".